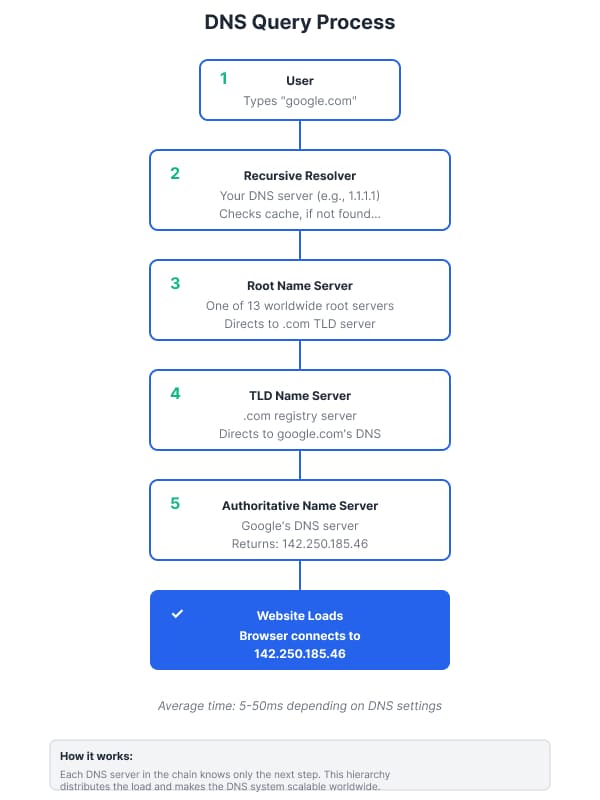
DNS (Domain Name System) settings determine which servers translate domain names into IP addresses. When you type “google.com” into your browser, DNS settings control which servers handle that request, affecting your browsing speed, security, and reliability.
The most commonly used public DNS servers are Cloudflare (1.1.1.1 and 1.0.0.1), Google (8.8.8.8 and 8.8.4.4), and Quad9 (9.9.9.9). Changing your DNS from your ISP’s default servers can improve browsing speed by 2-20ms per query, enhance security through malware blocking, and increase privacy by reducing data collection.
Quick navigation: Jump to instructions for Windows, macOS, Android, iOS, or Router.
What DNS Settings Actually Control
DNS settings configure how your device or network translates domain names into IP addresses. Think of DNS as the internet’s address book—DNS settings determine which address book your device uses, how it’s organized, and who gets to update the entries.
DNS operates through a hierarchical system where your device first contacts a recursive resolver, which then queries root name servers, TLD servers, and finally authoritative name servers to find the correct IP address. Each hop in this chain depends on proper DNS configuration.
Why DNS Settings Matter
A typical webpage connects to dozens or hundreds of different sites, each requiring DNS lookups before loading. Properly configured DNS settings can reduce each lookup from 50ms to 5ms—multiply that across every resource on every page you visit, and the performance difference becomes substantial.
When DNS settings malfunction, the symptoms appear everywhere. Organizations using Active Directory rely on DNS to locate domain controllers and services within their network. If DNS fails in this environment, users experience login failures and authentication issues even though the network infrastructure remains functional.
How to Change DNS Settings on Your Device
Changing DNS settings on your device allows you to use faster or more secure DNS servers instead of your ISP’s default options. The process varies by operating system, but generally involves accessing network settings and manually entering DNS server addresses.
Windows DNS Configuration
Windows 10 and 11 make DNS configuration accessible through the Settings app:
1. Open Settings by pressing Windows key + I, then navigate to Network & Internet.
2. Select your active connection type—either Wi-Fi or Ethernet—from the left sidebar.
3. Click on your connected network name, then scroll down and select Hardware properties.
4. Locate the DNS server assignment section and click the Edit button.
5. Change the dropdown from Automatic (DHCP) to Manual.
6. Toggle the IPv4 switch to On.
7. Enter your preferred DNS server in the first field (for example, 1.1.1.1 for Cloudflare).
8. Enter an alternate DNS server in the second field (such as 1.0.0.1).
9. Click Save to apply your changes.
Your device now uses the specified DNS servers for all internet connections. Changes take effect immediately, though you may need to restart your browser to clear any cached DNS entries. To verify the change worked, open Command Prompt and type “nslookup google.com” to see which DNS server responds to your query.
macOS DNS Configuration
Apple’s macOS provides DNS configuration through System Settings:
1. Click the Apple menu in the top-left corner and select System Settings (or System Preferences on older macOS versions).
2. Click Network in the sidebar.
3. Select your active network connection—typically Wi-Fi or Ethernet—from the list.
4. Click the Details button next to your connection name.
5. Navigate to the DNS tab at the top of the window.
6. You’ll see a list of current DNS servers. Click the + button below the DNS Servers list.
7. Enter your preferred DNS server address and press Return.
8. Click the + button again to add a secondary DNS server.
9. Click OK to save your changes.
macOS applies the new DNS settings immediately. To verify the change worked, open Terminal and run “scutil –dns” to display your current DNS configuration, or use “dig google.com” to see which DNS server responds.
Android DNS Configuration
Android offers two methods for changing DNS settings—system-wide Private DNS and per-network configuration:
Private DNS (Android 9 and newer):
1. Open Settings and tap Network & Internet.
2. Scroll down and tap Private DNS.
3. Select “Private DNS provider hostname” instead of Automatic.
4. Enter the hostname of your DNS provider (for example, “one.one.one.one” for Cloudflare or “dns.google” for Google DNS).
5. Tap Save.
This method applies DNS settings across all networks your device connects to, including both Wi-Fi and mobile data.
Per-Network DNS (all Android versions):
1. Open Settings and navigate to Network & Internet, then tap Wi-Fi.
2. Tap and hold the network name you’re currently connected to, then select Modify network.
3. Tap Advanced options to reveal additional settings.
4. Change IP settings from DHCP to Static.
5. Scroll to the DNS fields and enter your preferred DNS server addresses in DNS 1 and DNS 2.
6. Tap Save.
This configuration applies only to the specific Wi-Fi network you modified. You’ll need to repeat these steps for each network where you want custom DNS settings.
iOS and iPadOS DNS Configuration
Apple’s mobile devices allow DNS configuration on a per-network basis:
1. Open Settings and tap Wi-Fi.
2. Tap the information icon (i) next to your connected network.
3. Scroll down to the DNS section and tap Configure DNS.
4. Change from Automatic to Manual.
5. Tap Add Server and enter your preferred DNS server address.
6. Tap Add Server again to add a secondary DNS server.
7. If you see existing DNS servers listed above, tap the red minus icon to remove them.
8. Tap Save in the top-right corner.
iOS applies these DNS settings only to the selected Wi-Fi network. Cellular connections continue using your carrier’s DNS servers unless you configure a VPN or DNS profile.
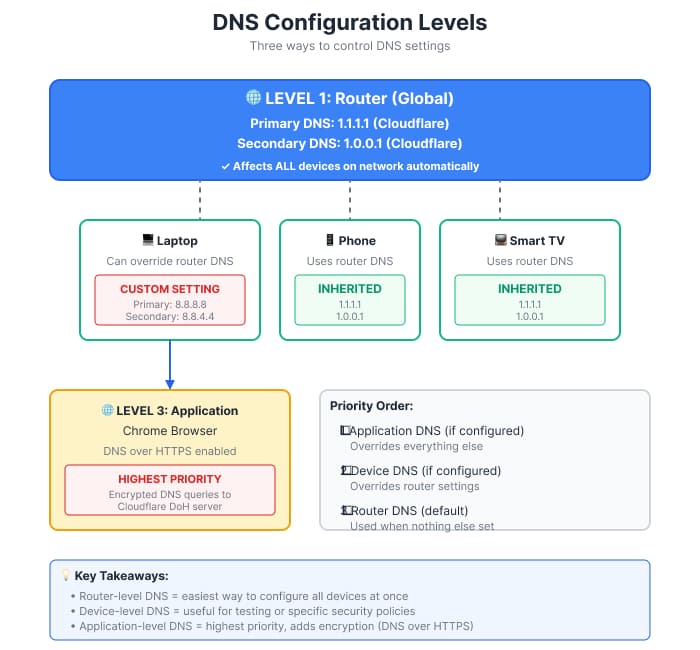
Router-Level DNS Changes
Changing DNS at your router level affects every device on your network automatically—computers, phones, tablets, smart TVs, and IoT devices all benefit from the change without individual configuration.
1. Access your router’s admin interface by entering its IP address in a web browser (commonly 192.168.1.1 or 192.168.0.1).
2. Log in with your administrator credentials.
3. Navigate to the WAN, Internet, or Network settings section (location varies by router manufacturer).
4. Look for DNS settings—you may need to switch from automatic to manual or custom DNS.
5. Enter your preferred primary DNS server in the first field.
6. Enter your secondary DNS server in the second field.
7. Save your changes and restart the router if prompted.
All devices receiving IP addresses from your router via DHCP will automatically use these DNS servers. This approach simplifies management and ensures consistent DNS configuration across your entire network.
Popular DNS Server Options
Choosing the right DNS provider depends on your priorities—speed, privacy, security, or reliability. Performance varies significantly by geographic location, so testing from your specific location provides the most accurate results.
Cloudflare DNS (1.1.1.1 and 1.0.0.1)
In December 2021 testing from UK data centers, Cloudflare DNS averaged 5ms response time from London and 8ms from Manchester. Testing from London showed even faster results at 1.14ms, while San Francisco results placed Cloudflare at 2.85ms. Real-world testing from Utah showed Cloudflare at 2ms average response time.
Cloudflare emphasizes privacy, promising to delete all DNS query logs within 24 hours and never sell user data. Third-party audits verify these privacy commitments. Cloudflare’s DNS service integrates with their CDN and security offerings, providing a unified platform for DNS management, DDoS protection, and content delivery.
Google Public DNS (8.8.8.8 and 8.8.4.4)
Google DNS showed average response times of 10ms in UK testing and 7.71ms from London specifically. Testing from Utah showed Google DNS averaged 19.4ms from that location. The service has maintained exceptional uptime and rock-solid reliability since launching in 2009, backed by Google’s global infrastructure.
Privacy-conscious users note that Google’s DNS service connects to their broader advertising ecosystem. Google does collect some DNS query data, though they state it’s anonymized after a period. For critical systems requiring maximum reliability, configure both Cloudflare and Google DNS servers for automatic failover.
Quad9 (9.9.9.9)
In multi-location testing across the US and UK, Quad9 frequently ranked in the top three for response times, with speeds ranging from 1.71ms in Atlanta to 11.00ms in Fremont. London testing showed Quad9 at 1.85ms, while San Francisco placed it at 2.14ms.
Quad9 adds security by blocking access to known malicious domains at the DNS level, adding a security layer beyond traditional antivirus. This prevents connections to phishing sites and malware distribution servers before your browser even attempts the connection. Quad9 is operated by a nonprofit organization and doesn’t log personally identifiable information.
Performance Comparison by Location
Your optimal choice depends on geographic proximity to each service’s servers. Testing from different locations shows dramatically different results:
London: Cloudflare 1.14ms, Quad9 1.85ms, Google DNS 7.71ms
San Francisco: Norton DNS 2.00ms, Quad9 2.14ms, Cloudflare 2.85ms
Utah: Cloudflare 2ms, Google DNS 19.4ms
Test multiple providers from your location to find the fastest option. Online tools like DNS Benchmark or namebench can automate this testing process.
Understanding Primary and Secondary DNS Servers
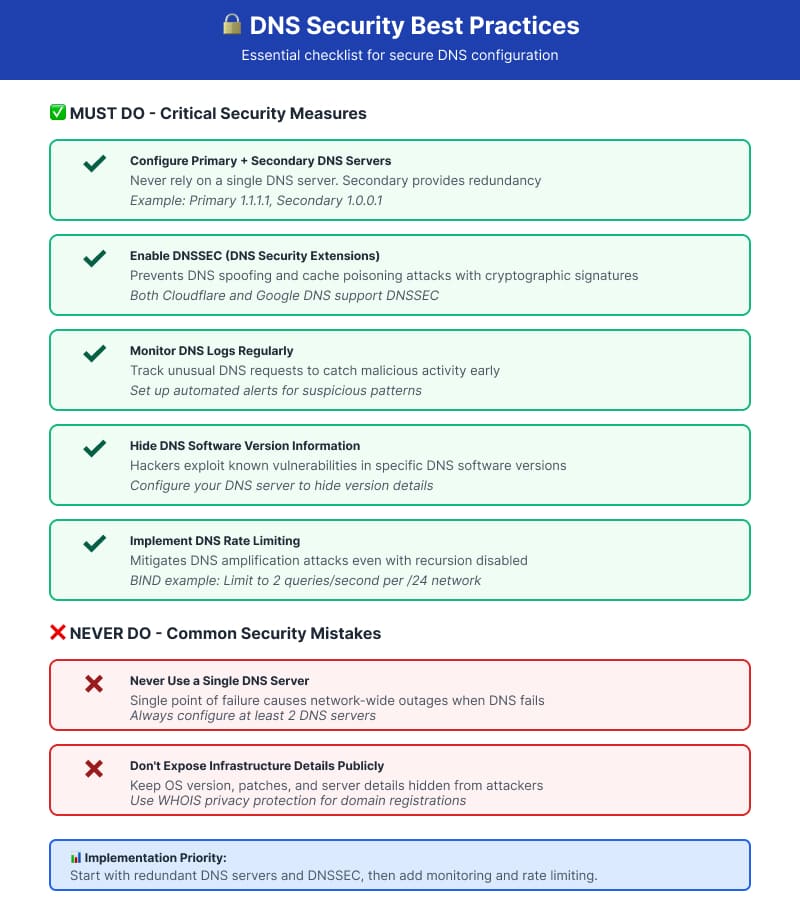
Your DNS configuration should always specify at least two DNS servers. The primary DNS server receives your requests first. If it fails to respond or experiences downtime, your system automatically queries the secondary DNS server.
Never configure just one DNS server. Single points of failure in DNS infrastructure cause widespread outages affecting every service that depends on name resolution—email, web browsing, application access, and cloud services all stop functioning when DNS fails.
Secondary servers host read-only copies of zone files as backup and help with load balancing through round-robin DNS to mitigate denial-of-service risks. Most networks configure these at the router level, automatically distributing the same DNS servers to all connected devices, though individual devices can override these settings when needed.
Common DNS Settings Explained
DNS Forwarding
DNS forwarding tells your DNS server to send external domain queries to specific upstream servers rather than querying the internet directly. Organizations commonly configure internal DNS servers to forward external requests to public DNS providers.
Microsoft recommends adding ISP DNS servers as forwarders in the DNS management console to handle external requests while internal servers manage local domain queries. This setup improves performance by caching frequently accessed external domains while maintaining full control over internal DNS records.
Conditional Forwarding
Conditional forwarding directs queries for specific domains to designated DNS servers. This becomes essential when managing multiple domains or connecting separate networks.
For example, a company with offices in different locations might use conditional forwarding to direct queries for each office’s domain to that location’s DNS server. Windows Server DNS supports unlimited conditional forwarding domains, allowing administrators to forward specific domain requests to different DNS servers that are authoritative for those zones.
TTL (Time To Live)
TTL settings determine how long DNS information stays cached before systems must request fresh data. Lower TTL values (like 300 seconds) mean more frequent updates but increased query traffic. Higher TTL (like 86400 seconds or 24 hours) reduces load but delays propagation of DNS changes.
When planning DNS changes like switching hosting providers or updating IP addresses, temporarily reduce TTL to 300-600 seconds 24-48 hours beforehand. This ensures changes propagate quickly once implemented. After the change completes successfully, increase TTL back to higher values to reduce query load.
DNS Settings for Website Platforms
Different website platforms require specific DNS configurations to connect custom domains. The fundamental process remains consistent across platforms: point your domain’s DNS records to the platform’s servers using the values they specify.
Shopify DNS Setup
Shopify requires A records pointing to their servers along with CNAME records for the www subdomain. The exact IP addresses and values change periodically as Shopify updates infrastructure, so always consult Shopify’s current documentation during setup rather than using outdated values.
Squarespace DNS Setup
Squarespace provides DNS settings in your domain connection panel. If using external DNS management, you’ll configure A records for the root domain and CNAME records for www. Squarespace also requires specific MX records if using their email forwarding service.
Webflow DNS Setup
Webflow requires A and CNAME record configuration, with specific IP addresses provided in your project settings under the hosting tab. Webflow provides detailed instructions and validates your DNS configuration automatically once records propagate.
Troubleshooting DNS Issues
DNS Cache Problems
Sometimes your device caches outdated DNS information, causing connection problems even after DNS records update correctly. Flushing the DNS cache forces your system to retrieve fresh information from DNS servers.
On Windows, open Command Prompt and run: ipconfig /flushdns
On macOS, use Terminal: sudo dscacheutil -flushcache
On Linux: sudo systemd-resolve --flush-caches
After flushing the cache, test connectivity again. If problems persist, verify the DNS records updated correctly using online DNS lookup tools like WhatsMyDNS.net, which checks DNS propagation from multiple locations worldwide.
Slow DNS Resolution
When you experience slow website loading despite having good internet speed, DNS resolution delays may be the culprit. Network administrators can capture DNS traffic to diagnose issues, often discovering high numbers of queries with no corresponding responses indicating unreachable or misconfigured servers.
The solution involves removing unreachable servers from your DNS configuration and prioritizing low-latency servers. Test response times before and after changes to quantify the improvement. Tools like DNS Benchmark measure response times from your location to different DNS providers.
Local DNS Servers for Performance
Organizations with multiple office locations should deploy local DNS servers at each site to speed up DNS request responses. Users experience slower load times when queries travel over wide area networks to distant nameservers, especially noticeable when pages connect to numerous external resources.
DNS caching servers like Unbound or dnsmasq query authoritative servers and keep cached lookups local to your network, giving even new clients very quick access to DNS queries without repeatedly querying internet servers. This dramatically improves performance for frequently accessed domains.
DNS Security Best Practices
Enable DNSSEC
DNSSEC (DNS Security Extensions) adds cryptographic signatures to DNS data, preventing attackers from redirecting your traffic through DNS spoofing or cache poisoning attacks. Both Google and Cloudflare DNS support DNSSEC validation.
DNSSEC works by creating a chain of trust from the root DNS servers down to individual domain names. Each level signs the records of the level below, creating verifiable proof that DNS responses haven’t been tampered with. Enable DNSSEC validation in your DNS resolver settings to benefit from this protection.
Monitor DNS Logs
Keeping and analyzing DNS logs helps identify attacks and unusual patterns. Alert systems monitoring unusual DNS requests allow administrators to catch malicious activity before it causes damage.
Regular log reviews reveal patterns indicating security vulnerabilities, misconfigured applications making excessive queries, or inefficiencies in DNS setup. Automated monitoring tools streamline this process, especially for larger networks. Look for sudden spikes in query volume, queries to suspicious domains, or repeated failed lookups.
Protect DNS Configuration Information
DNS software version information should remain private, as hackers exploit vulnerabilities specific to particular software versions. Configure your DNS server to hide version details and other infrastructure information that could assist attackers in reconnaissance.
Limit zone transfer permissions to authorized secondary servers only. Disable DNS recursion on authoritative nameservers to prevent them from being used in amplification attacks. These simple configuration changes significantly reduce your attack surface.
Advanced DNS Configuration
Split DNS Setup
Split DNS maintains separate internal and external DNS servers that both resolve the same domain name differently depending on the query source. Internal queries receive private IP addresses while external queries get public IPs.
This configuration allows internal users to access resources directly through private networks while external users connect through firewalls or public-facing services. For example, employees accessing “intranet.company.com” receive a private 10.x.x.x address, while that same hostname returns a public IP for external access attempts.
Split DNS requires careful management to keep both zones synchronized. Changes must be made in both internal and external DNS zones, and inconsistencies can cause confusion and connectivity problems.
GeoDNS for Multiple Locations
Organizations with multiple target markets in different locations use GeoDNS to direct customers to servers closer to them, optimizing traffic distribution based on geographic locations. This reduces latency and enhances user experience by routing users to the nearest or least loaded server.
For example, a global website might direct European users to servers in Frankfurt, Asian users to Singapore, and North American users to Virginia. GeoDNS also enables failover mechanisms, seamlessly rerouting traffic during server downtime to increase service reliability.
Businesses serving customers in regions with limited DNS infrastructure can significantly improve response times by deploying nameservers closer to their users, reducing latency compared to routing through distant data centers.
DNS Rate Limiting
Even with recursion disabled on authoritative DNS servers, they can still be exploited in DNS amplification attacks where attackers spoof victim IP addresses and trigger large DNS responses. Rate limits are essential to mitigate these attack vectors.
For BIND software, rate limiting can restrict queries to two per second on average for each IPv4 class C network, significantly reducing the effectiveness of DNS-based DDoS attacks. Modern DNS software includes built-in rate limiting features that should be enabled and tuned based on your normal traffic patterns.
Choosing the Right DNS Settings for Your Needs
Your optimal DNS configuration depends on your specific priorities:
For Speed: Test multiple providers from your actual location using DNS Benchmark or similar tools. Geographic proximity to DNS servers dramatically affects performance—a provider that’s fastest in one region may be slower in another. Choose the provider with consistently low latency from your location.
For Privacy: Cloudflare emphasizes privacy with third-party audited policies promising not to log IP addresses or sell data. Quad9, operated as a nonprofit, also maintains strong privacy policies. Consider DNS-over-HTTPS (DoH) or DNS-over-TLS (DoT) to encrypt DNS queries and prevent ISP monitoring.
For Security: Quad9 blocks queries to known malicious domains at the DNS level, providing protection before browsers or antivirus software get involved. Cloudflare offers similar security features through their 1.1.1.1 for Families service. Combine security-focused DNS with DNSSEC validation for comprehensive protection.
For Reliability: Google DNS has maintained exceptional uptime since 2009. Configure multiple DNS providers from different organizations for automatic failover—for example, set Cloudflare as primary and Google as secondary. This ensures continued operation even if one provider experiences outages.
DNS Over HTTPS and DNS Over TLS
Traditional DNS queries are unencrypted, allowing ISPs and network operators to see every domain you visit. DNS-over-HTTPS (DoH) and DNS-over-TLS (DoT) encrypt DNS queries, protecting your privacy from network-level monitoring.
Modern web browsers support DoH built-in. Firefox and Chrome can be configured to use DoH through their settings, encrypting DNS queries even when system-level DNS remains unencrypted. This provides an additional privacy layer for web browsing.
Operating systems increasingly support encrypted DNS as well. Windows 11, iOS 14+, and Android 9+ include native support for DoH or DoT. Enable these features in network settings to encrypt all DNS traffic from your device.
Verifying DNS Changes
After changing DNS settings, always verify the changes took effect correctly:
On Windows, open Command Prompt and type nslookup google.com to see which DNS server responds to your query. The server address shown confirms your active DNS server.
On macOS or Linux, use Terminal with the command dig google.com or nslookup google.com. The output shows which DNS server answered the query.
Online tools like dnsleaktest.com provide a browser-based method to check which DNS servers your device actually uses, useful for verifying changes on any platform without using command-line tools.
Testing from multiple devices on your network confirms that router-level changes propagated correctly to all connected devices.
The Bottom Line
DNS settings form the foundation of internet connectivity and network functionality. Proper configuration ensures fast resolution times, protects against security threats, and maintains service availability.
The most impactful changes you can make:
- Configure both primary and secondary DNS servers—never rely on just one
- Choose DNS providers based on testing from your actual location
- Enable DNSSEC validation for security on both servers and clients
- Use encrypted DNS (DoH or DoT) to protect privacy
- Monitor DNS performance and logs to catch issues early
- Test DNS changes thoroughly before full deployment
Your DNS provider matters less than ensuring redundancy and monitoring. Even the fastest DNS service becomes useless if it’s your only configured option and experiences downtime. The reliability advantage of multiple well-configured DNS servers outweighs marginal performance differences between providers.
Start with reliable defaults like Cloudflare (1.1.1.1) as primary and Google (8.8.8.8) as secondary, then optimize based on your specific requirements and testing results. For most users, this combination provides excellent speed, reliability, and privacy without complex configuration.